AML Onboarding & VOI

Compliant client onboarding and identity verification

AML/CTF Compliance Centre

Complimentary, all-inclusive AML/CTF solution

Searches and Certificates

Order all your searches and certificates in one place

Property Interface

A dynamic, matter specific environment

Family Law Interface

Manage family law matters with one solution

Wills & Estates Interface

Simplify estate administration and planning

Contract Review tool

Review contracts faster with AI-assisted precision

Settlement Services

Electronically lodge registry documents and settlements

Financial Disclosure

Securely collate client financial documentation

Process Serving

Serve documents fast with tracking

Practice Management Integration

Streamline administrative tasks and optimise workflows

Integration Support Guides

Access our support guides for comprehensive self-help assistance

InfoTrack Connect

Allows suppliers to connect their products and services with the InfoTrack Ecosystem

Next Gen Integration

Learn how software and integrations can transform the way you work

News and Insights

Find out the latest industry updates

AML/CTF Training

Take on compliance with confidence

Events and Webinars

Take your professional development to the next level

Cyber Security Awareness Training

Build your cyber resilience

Property Market Update

Discover leading edge property insights

InfoTrack on Claude Cowork

Access InfoTrack directly inside Claude Cowork

playbook playbook white logo
Monthly digest covering the latest news for legal and conveyancing industries.

About Us

Learn more about who we are and what we do

Our Team

Find out who drives InfoTrack's innovation and strategy

Join Us

Be a part of our award-winning culture

Media

Featured media releases and mentions

Contact

Get in touch with a member of our team

Awards

Showcasing our people, solutions and service

Discover our award-winning technical innovations.

LEAP

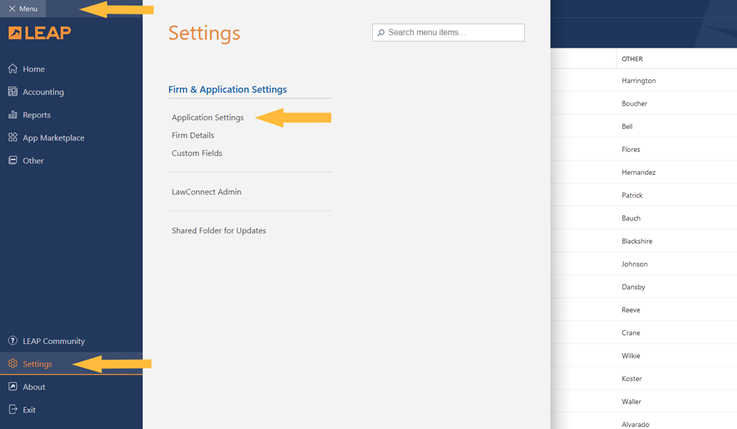
Step 1: Open LEAP and click Menu > Settings > Application Settings.


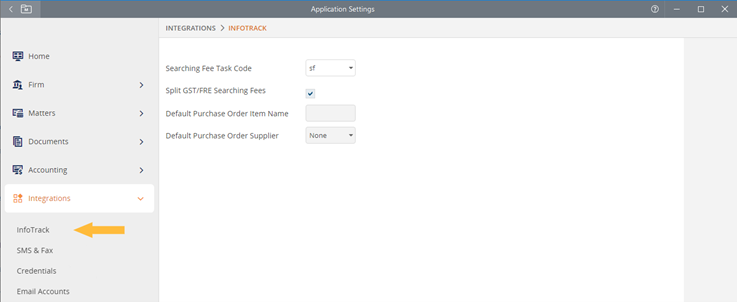
Step 2: Select the Integrations drop-down menu and click InfoTrack. Select the appropriate Searching Fee Task Code to be used from the drop-down list. Tick the Split GST/FRE Searching Fees checkbox, (default). When this option is selected, cost recoveries that have a GST free portion will be split into 2 individual cost recoveries, 1 for the taxable item and 1 for the GST free item.

If you use Xero, you can set the Default Purchase Order Item Name and Default Purchase Order Supplier from this screen.

Click Save.


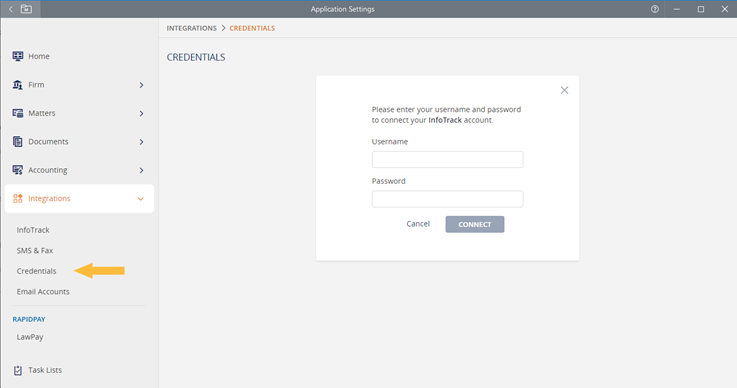
Step 3: Select the Integrations drop-down menu and click Credentials. Then enter the username and password you selected when creating your InfoTrack account. Click Connect.


Once you have connected your InfoTrack and LEAP accounts, you can begin placing orders. Open a Matter and navigate to the Searching and Services button on your matter ribbon.



Click the Searching & Services button on the toolbar and The InfoTrack Searching & Services window will open.

Accessing InfoTrack Search results in LEAP

When the search has been completed, the document is automatically placed in the Correspondence List of the matter where the search was initiated with a status of Complete.

InfoTrack Cost Recoveries

When you place an order for an InfoTrack search or product, an associated Cost Recovery will be automatically imported into the matter for billing.

To view Cost Recoveries, Open the matter and click the Office Accounting > Cost Recoveries tabs.

You’ll notice an entry in the table for the search or service you ordered using InfoTrack. You can proceed to invoice the entry to your client.

View a Summary of Search Fees for a Matter

Open the matter, select the Details & Correspondence tab. Click the dropdown arrow next to Searching & Services on the toolbar. Select Searching Fees Summary.

The Searching Fees Summary will open in a new window.

Reconcile Searches

Click the LEAP Menu > Accounting > under Office Accounting > Reconcile Searches. The Reconcile Searches will open in a new window.

Select the date range and order status.

Tick the entries that appear on your invoice for a matter.

Click Reconcile Now to finalise or click Save & Reconcile Later to come back to it another time.

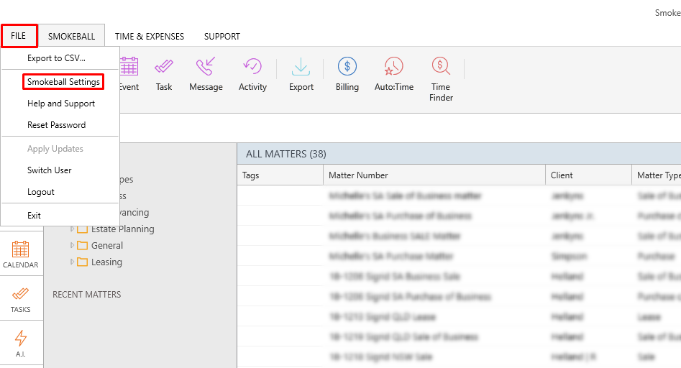
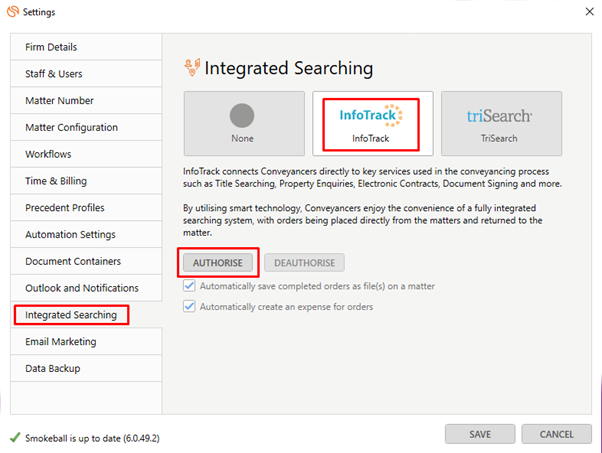
1. Login to Smokeball  2. Go to the Smokeball Settings  File → Smokeball Settings 3. Select InfoTrack as your search Provider Integrated Searching → Select InfoTrack → Click Authorise
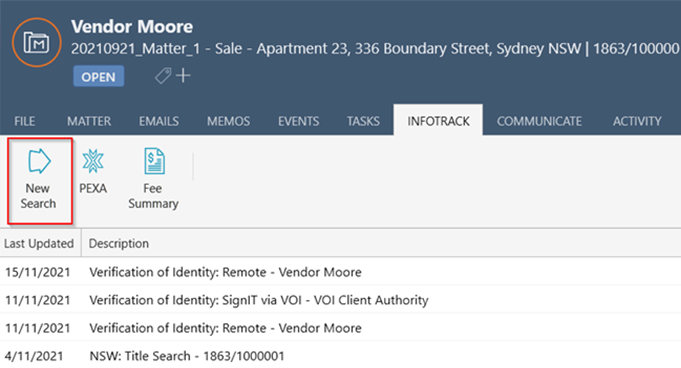
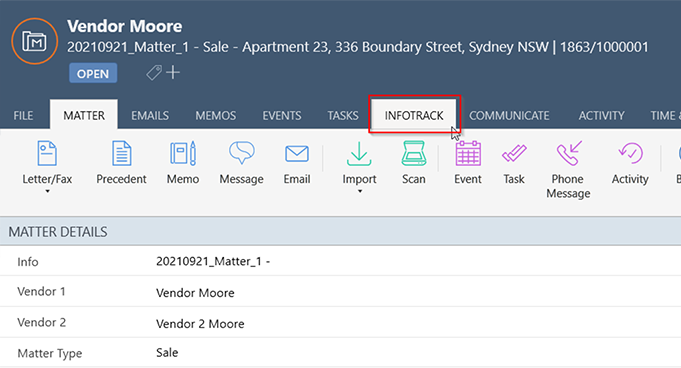
Open a matter and click on the InfoTrack Tab In the tab, it will show the history of orders for that matter, to start searching with InfoTrack just click on the ‘New Searches’ Button which will direct you to the InfoTrack website.